Reading Time: 5 minutes
Containerization of applications using Docker with Visual Studio 2017 is trendy, but it is not so easy to understand what is happening in the background.
Therefore, in this blog post I´m going to explain why using containers is beneficial and what a container or image is. Then we talk about how to set up Docker with Visual Studio on Windows 10.
In part 2 of this blog post series I´m going to dive deeper in an example project and explain the created Docker files and executed Docker commands, which are simplified with the Visual Studio Docker integration.
You can find part 2 here.
Ok, let´s start with the purpose of using containers.
Why using containers?
Although it is relatively complex to set up your whole infrastructure to use containers, it gives you a lot of benefits on the long run.
However, the usage of containers is not always the best approach for every project nor company.
Using containers is usually beneficial when you use Scrum performing a lot of deployments and you are using a Microservice architecture.
Let´s have a closer look to those two areas – Scrum with regular deployments and Microservice architecture.
Scrum with regular deployments
The value of Scrum is to deliver a “Done”, useable, and potentially releasable product Increment each sprint, so you can get feedback as soon as possible.
Therefore, it is necessary to ship your new features to your customers as soon as possible. This means that you want to deploy as often as possible.
As the deployment is done quite often, it should be as simple and effortless as possible. You don´t want your team to spend a lot of time to deploy new features. Therefore, it is wise to automate the deployment.
Then you can focus your main effort on building new features instead of deploying them.
Containers can help you to simplify the deployment of (or rollback to) different versions of your application to staging environments as well as the production environment.
This is especially true if your application consists of a lot of small services, which happens a lot these days, as a new architectural style in software development is widely adopted – the Microservice architecture.
Microservice architecture
Martin Fowler, a very well known figure in the software architecture world, explains in his article, that the Microservice architecture approach has become very popular during the last couple of years.
The main concept of the Microservice architecture is to split up your application in lots of small services, which talk to each other, instead of having one big monolithic application.
While both architectures (microservice as well as monolithic) have their benefits and downsides one important distinction is that you have to deal with a lot of services when using a Microservice architecture.
Therefore, a lot of tools have been created in the recent years to manage and deploy those vast amount of services in a coordinated and automated fashion.
One very popular tool for this is Docker.
What are containers?
But what are containers exactly? What is an image? What´s the difference to a virtual machine? And what´s docker?
Let´s have a look at these terms and make them more clear, before we dive deeper into how to install Docker on Windows.
Virtual machine vs Container vs Docker
Virtualization of computers has been widely adopted in the past two decades, because it has some big advantages.
Compared to dedicated servers, Virtual Machines (VMs) are easy to move around, from one physical server to another. It is easy to create backups of the whole virtual machine, or restore to a previous state (for instance before the update has been applied, which broke the application).
Containers are a bit similar to VMs, because we can also move containers around easily and create backups of different versions.
However, the main difference is that containers are much more lightweight compared to VMs.
While each VM has it´s own operating system installed, containers can share the same operation system.
The two main advantages of containers over VMs are that containers start up much faster (in milliseconds) and use less resources resulting in better performance.
To say it in one sentence: Containers are lightweight and portable encapsulations of an environment in which to run applications.
Ok, now we know about VMs and containers. How does Docker fit in here?
Docker is a company providing container technology, which is called Docker containers.
While the idea of containerization is around for quite some time and has also been implemented on Linux (called LXC), Docker containers introduced several significant changes to LXC that make containers more flexible to use.
However, when people talk about containers these days, then they usually mean Docker containers.
Image vs Container
There is a difference between an image and a container. The two are closely related, but distinct.
An image is an immutable file, that´s essentially a snapshot of a container. It´s build up from a series of read only layers.
To use a cooking methaphor: if an image is a recipe, a container is the cake. Or using a programming methaphor: if an image is a class, a container is an object or instance of the class.
You can create multiple instances of an image, therefore having multiple containers based on the same image.
Windows Containers vs Linux Containers
You can run Docker containers on Linux as well as on Windows.
However, on Windows native Docker support is only provided on the newer versions of Windows: they are supported on Windows 10 and on Windows Server 2016 (and on Azure of course).
As we already mentioned above, containers share the operating system kernel. Therefore, we have to distinguish between Linux containers and Windows containers, because they target different kernels (Windows kernel vs Linux kernel).
However, on Windows 10 for example, we can run Windows containers as well as Linux containers.
Why and how that works, I´m going to explain in a minute.
But at first, let´s set up Docker on Windows 10.
Setting up Docker on Windows 10
This is basically very simple and just consists of two steps, which you can read up on the documentation pages of Docker. But what is missing on the Docker documentation pages is some additional information on what is happening in the background.
That´s why I´m trying to give more insights on that here.
CPU Virtualization must be enabled
Before you install anything else, make sure that CPU virtualization is enabled in your bios. At first I didn´t check this on my Laptop and got very weird errors. It took me some time to google the error “Unable to write to the database” and figure out that the problem was due to CPU virtualization was not enabled.
So make sure this is configured on your machine before you proceed.
Install Docker for Windows
Next you have to install Docker for Windows.
When you do this a couple of things happen in the background.
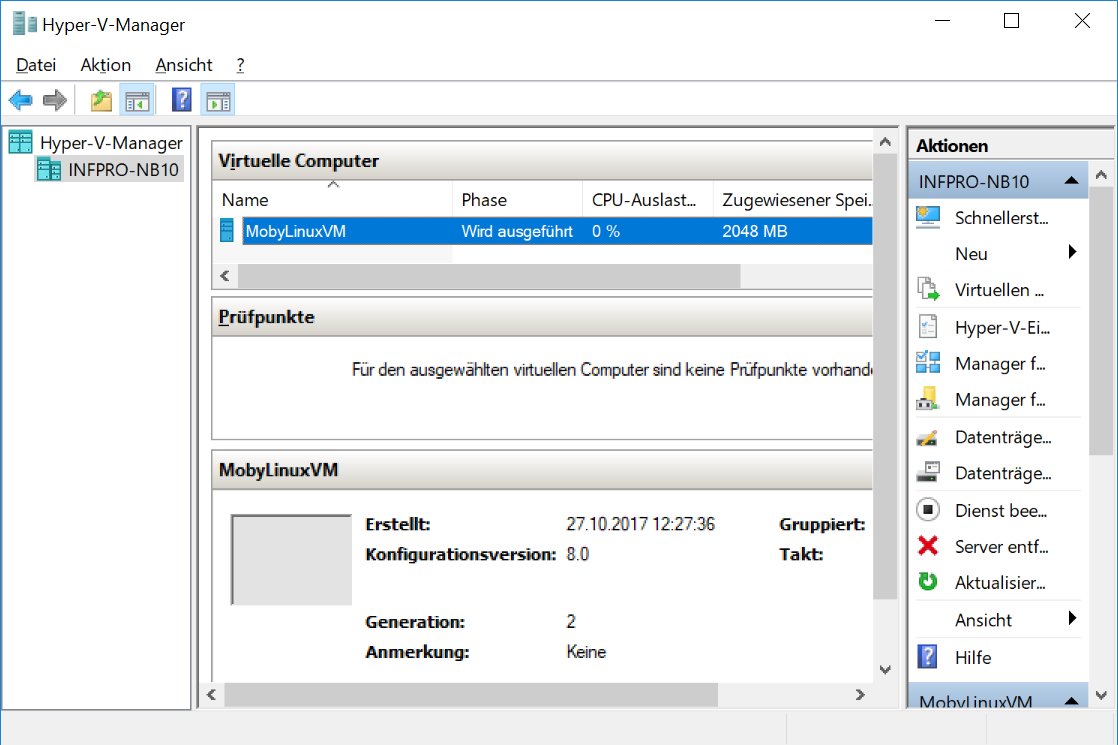
First of all, the Hyper-V Windows feature is enabled on your machine. This feature is a hypervisor service, which allows you to host virtual machines.
Then a new virtual machine (VM) is created. This VM runs a MobyLinux operating system and is hosted in Hyper-V. If you open the Hyper-V manager after you installed Docker for Windows, you will see something like this:

By default the virtual hard disk of this VM is stored on:
C:\Users\Public\Documents\Hyper-V\Virtual hard disks
This MobyLinux VM has Docker host installed and every Linux Docker container we are going to start up, will run on top of this VM.
Every Windows Docker container however, will run natively on your Windows 10 machine.
Now as you have Docker installed on your local machine, let´s have a look at how Visual Studio is integrated with Docker.
In part 2 I´m going to run through an example application for Docker with Visual Studio 2017 and explain each file, which is created by Visual Studio when adding Docker support.
I´m also going to explain the commands, which are executed by VS, when you start or debug your application within a Docker container.
You can find part 2 here.
Stay tuned and HabbediEhre!


Trackbacks/Pingbacks